by Savannah Holloway, Holloway, RN, Birth Assistant

What a year 2020 was! The pandemic turned everyday life upside down for everyone—adults and children alike. Many parents were faced with the challenge of home-schooling AND home-entertaining. Families across New Mexico were excited when many schools opened on April 5,but one month later, the semester is finishing. Kids are out for the summer and, possibly,feeling isolated from friends again. Hopefully, your children will have the opportunity to spend some time with family and friends this summer as our COVID-19 numbers continue to drop, but if you’re a parent struggling to keep your children’s creative minds entertained, here are four all-natural, at-home summer activities for kids — and adults — to enjoy!
Natural Fabric Dye
Sure, you can run to the store and purchase non-toxic dyes and fixatives, but why not use what you already have around the house? Using several simple ingredients (that you likely already have!), you can dye, or even tie-dye, old clothing, towels, or cloths at home!
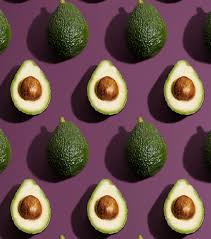
There are several food items that create beautiful, natural dyes including: avocado pits and skins, yellow onion skins, lemons, spinach, red cabbage, and ground turmeric. Below are instructions for dyeing with avocado pits (yields dusty pink color). If you are interested in dyeing with other food products, Google is a great resource! The general steps remain the same.
You will need:
- 3-4 avocado pits per 1/2 lb of natural fiber fabric — the more pits, the darker the dye
- A large, stainless steel or glass bowl
- Tongs or slotted spoon
- Stainless steel pot for boiling
- Fresh water
- Salt and vinegar*
*Note: Fabrics need to be treated prior to dyeing or the dye won’t stick. For cotton fabrics, threads, or yarns the best all-natural fixatives are salt and vinegar.
To prepare the fabric:
- Fill a large pot with one gallon of fresh water.
- Add ¼ cup salt and 1 cup of vinegar.
- Add fabric loosely to the solution.
- Bring to a low simmer for one hour, and continue to stir occasionally.
- Squeeze the solution out of the fabric and be ready to immerse in dye solution while still wet.
To prepare the avocado pit dye:
1. Wash the avocado pits completely to remove any flesh.
2. Add to pot and cover with enough water to fully submerge fabrics.
3. Bring the water and avocado pits to a boil and then reduce to a simmer.
4. Let simmer for at least one hour. You can simmer for longer, and let the mixture soak overnight to deepen the color (just remember to turn off your stove before you go to bed!).
5. Remove the pits with tongs or a slotted spoon, and skim and flesh off of the surface.
6. Add the WET fabrics to the pot and bring to a simmer again. Be sure to stir to fully submerge your fabrics.
7. Let simmer for 30 to 60 minutes. Then turn off the heat and move off of the burner.
8. Fabric will be a dusty pink color. After being washed, the fabric will be several shades lighter than it looks now. If you want a darker color, let the fabric sit in the dye solution overnight.
9. When you’re happy with the color, remove from the dye mixture and rinse in the sink.
10. Place the fabric in the dryer and dry it prior to washing in washing machine. This is an extra step to set the color.
11. Enjoy!
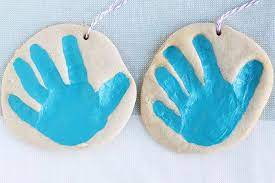
Salt Dough Sculpture
This was one of my favorite summer activities as a kid! Salt dough is a make-at-home dough that can be baked into forever sculptures (and forever memories!).
You will need:
- Measuring cups, bowl, cling wrap, parchment paper, rolling pin, and cookie cutters
- Flour
- Salt
- Water
- Cooking oil
To make salt dough:
- Mix 1 cup plain flour with 1 cup of table salt in a bowl.
- Make a hole in the center of the mixture and pour 1 cup of boiling water in the hole, little by little.
- Mix the dough until it’s no longer crumbly. If it’s crumbly, continue to add little bits of water.
- Knead the dough until it’s smooth, usually about five minutes.
- Add drops of cooking oil to make the dough soft and pliable.
- Put the dough onto baking paper and roll it out with a rolling pin.
- Use cookie cutters to cut FUN shapes! You can also use your fingers to mold the dough into sculptures and figures.
- Heat oven to 325 degrees F.
- Arrange shapes and sculptures on baking sheet lined with parchment paper.
- Bake your shapes and sculptures for 30-60 minutes, or until dry.
- Remove from the oven, and let cool.
- Enjoy your fun sculptures!
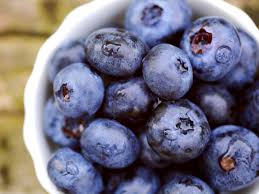
Natural Food-Coloring
Looking for non-toxic, all-natural, easy-to-make food coloring? Below are instructions for making purple food dye using food ingredients only. *Other foods that yield great food coloring colors: turmeric, beets, spinach, strawberries
You will need:
- A blender or food processor
- Blueberries (frozen often yields a darker color!)
- Water
To make food coloring:
- Add ½ cup of thawed blueberries to a blender or food processor.
- Add 1/3 cup of water to the blender.
- Blend well.
- Strain through a sieve to remove any solids, so you’re only left with liquid.
- Store in an airtight jar or container in the refrigerator… it can last for several weeks!
- Use this food-grade food coloring to color frostings or icings.
- Enjoy!
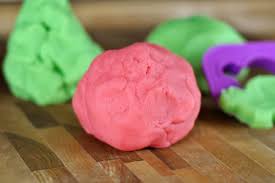
Playdough
You will need:
- Flour
- Salt
- Cream of tartar
- Water
- Vegetable or coconut oil
- Large pot
- Spoon for stirring hot mixture
- Blender or food processor
- Food coloring (use your natural food coloring from the recipe above!)
To make playdough:
1. Add 2 cups of all-purpose flour, ¾ cup of salt, and 4 teaspoons cream of tartar together in large pot and stir together.
2. Add 2 cups of slightly warm water and 2 Tablespoons of vegetable oil (or coconut oil).
3. Cook over medium heat, STIRRING CONSTANTLY!
4. The dough will start to thicken. Once it forms into a ball, remove it from heat and place it into a bowl or on wax paper.
5. Once it’s cool enough to handle, knead until smooth.
6. If adding multiple colors, separate into several balls and place in bowls.
7. Add natural food coloring accordingly! Knead it until the color is fully incorporated. If using store-bought food coloring, use gloves or a plastic bag to avoid staining your hands.
8. PLAY! Be sure to store it in an airtight container to maintain softness.
Share your homemade creations by tagging Dar a Luz on social media! Here’s to a summer full of adventure, community, and creativity.
Blessings,
Savannah
Savannah strongly believes in a holistic approach to health and wellness. She is passionate about the idea that pregnancy is a beautiful journey, and feels passionately that women should have the opportunity to birth their babies the way they choose. She is married to a wonderful man who gives her confidence and encouragement to be her best self. In her free time, she enjoys spending time with her family, snuggling her adorable cat, serving at church, dancing, learning new languages, gardening, cooking, and baking. She is thrilled to be part of this wonderful team here at Dar a Luz, and thoroughly excited to be part of many beautiful births.
Latest Articles

June 2025 Newsletter

May 2025 Newsletter
